Qt Designer
About
Qt Designer is a Qt’s Framework tool for designing and building graphical user interfaces (GUIs) from Qt components. With it, you can compose and customise widgets or dialogs in a what-you-see-is-what-you-get (WYSIWYG) manner, and also test them using different styles and resolutions.
The reason why Boundless Desktop includes Qt Designer is because it’s extremely useful to create QGIS plugins’ interface dialogs, but also to create highly customised feature forms for editing vector layers’ attributes in QGIS projects. With that in mind, the shipped version brings a set of very convenient special widgets for QGIS (as an example, a combobox with all project’s loaded layers).
Qt Designer is created by the same team that delivers the Qt Framework. See more information about it in Qt official website
Quick start guide
The following quick start guide will introduce you to Qt Designer basics. It will show how to create a simple custom feature form for a vector layer in QGIS.
Download the data for this tutorial
here. Unzip it to whatever folder you think is most convenient.Open Qt Designer using any of the available shortcuts in your computer.
By default, Qt Designer will show the New Form dialog on opening.
Choose
Dialog with Buttons Bottomfrom the template\forms list and press Create.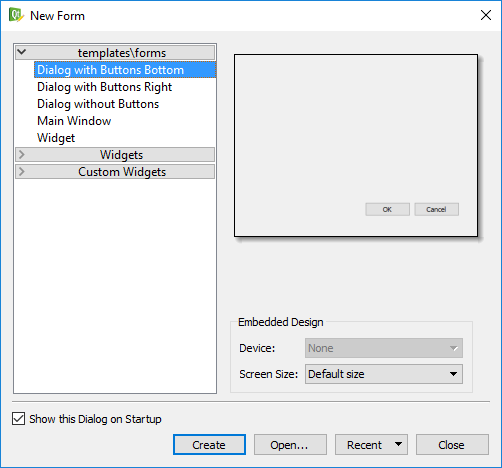
New form dialog window
Have a quick look into the Qt Designer‘s graphical user interface (GUI):
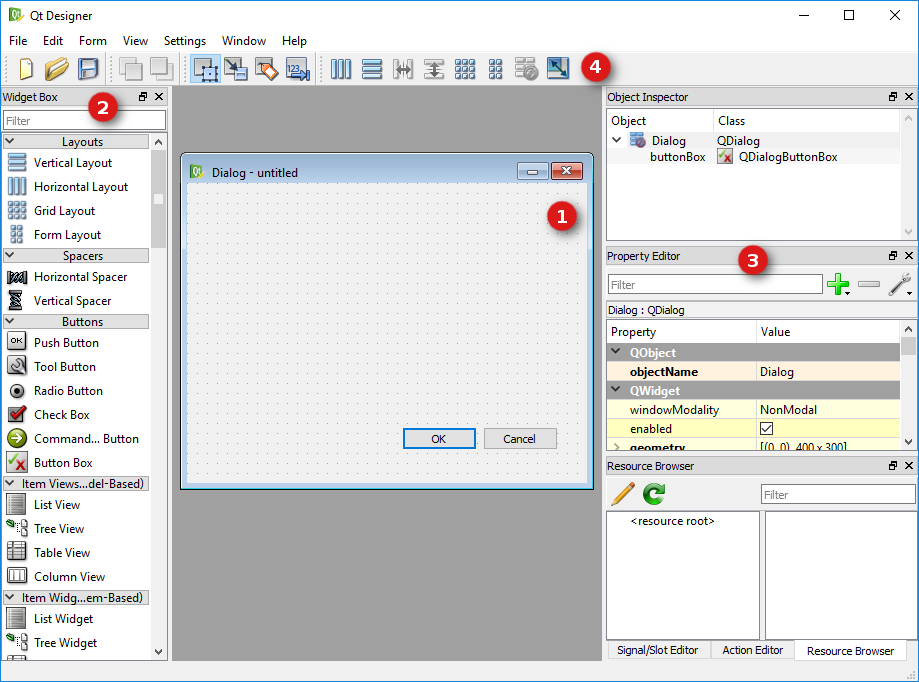
- In the middle of the screen, you will find the recently created new dialog, a blank form with only a pair of ok-cancel buttons (1).
- On the right-hand side of the screen you will find the Widget box which lists all available widgets (2). This list can be used to insert widgets by simply dragging and dropping them on top of the dialog.
- In the left-hand side (among others) there’s the Property Editor (3), that can be used to edit the properties of the dialog itself or of each inserted widgets.
- Finally, in the top, near the menus, you will find the Forms toolbar(4), which we will use to impose some alignment layout for consistency purposes.
Note
In Mac OS X, Qt Designer starts up in Multiple Top-Level Windows mode by default, looking very different from what is presented above. To change it, you should go to and choose
Docked Windowin the User Interface Mode.To see what widgets we want to use on the new form, we will need to inspect the data’s attributes and the layer’s current feature form.
Open QGIS by using any of the available shortcuts in your computer.
Click the Add Vector layers button in the Manage layers Toolbar (or use the ) to browse to the
events.shpshapefile location. (see QGIS Quick start guide if you need help with this task)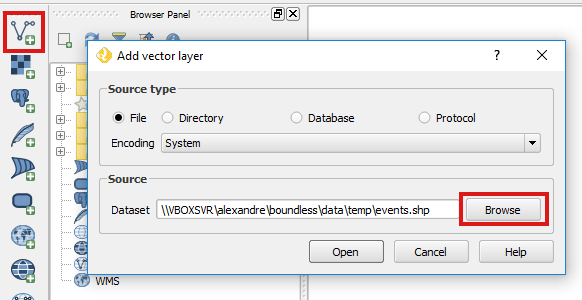
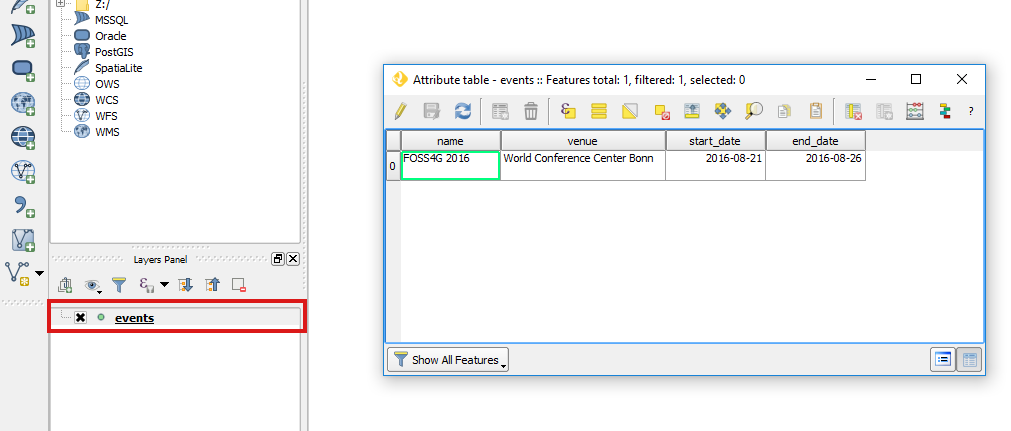
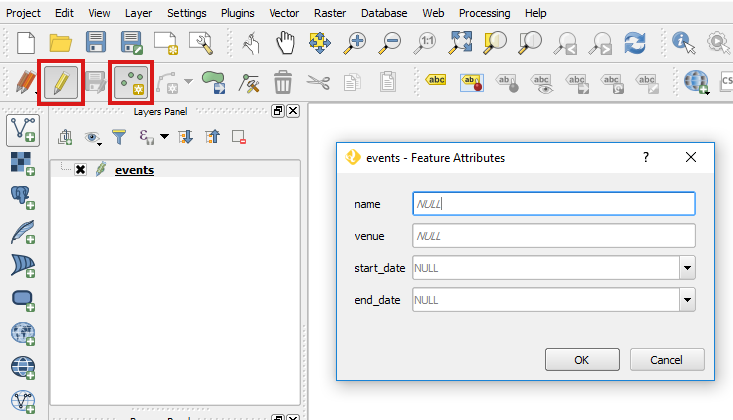
Right-click the recently loaded layer’s name in the Layers panel and choose the option Open attribute table. Then, take some time noticing the layer’s field names and types.
Let’s now have a look at the layer’s current feature form. Go back to QGIS main window, select the events layer and click Toggle editing in the digitising toolbar (if not visible check ). In the same toolbar, select the Add Feature tool and click anywhere in the map canvas to add a new point to your layer. This step should insert a point in the map canvas and show the default layer’s feature form. Take some time analysing the feature form and then press Cancel to discard any changes.
Let’s go back to Qt Designer and add the necessary widgets for the first field: name.
We will start by adding a text label to our form. Scroll down the Widget box to locate the Label widget in the Display widgets group. Now, drag and drop it on the form. You can change the label’s text either by double-clicking label itself and typing or using the Property Editor, more precisely at the Text property. Set the value to
Event's name. If necessary, expand the label box using the small squares in its border.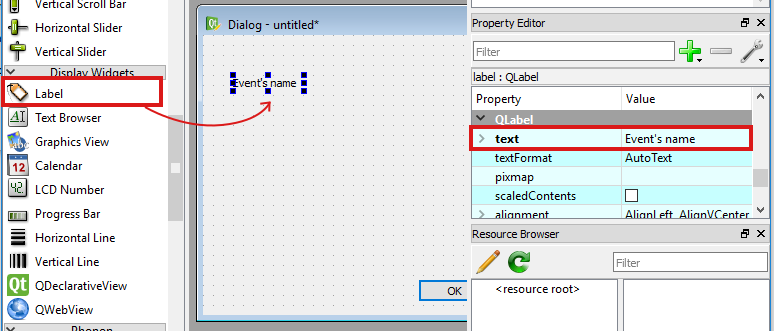
Now let’s add an input widget for the name field. This time, instead of scrolling down the Widget box to locate the widget, try typing
line editon the filter bar at the top of it. Drag and drop a Line edit widget to be right below of the label.
Repeat steps 7 and 8, for the venue field (or just select both existing widgets pressing the
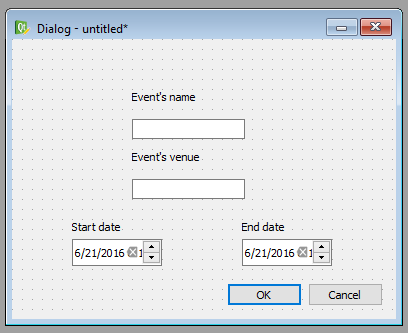
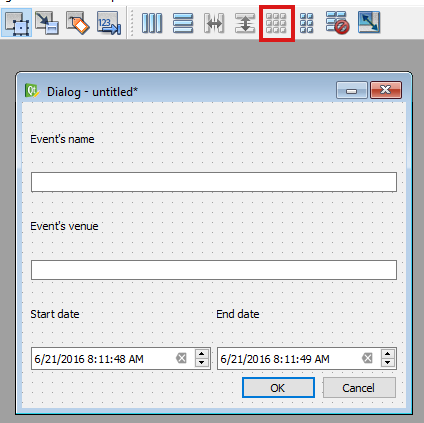
Ctrlkey, and copy (Ctrl+c) and paste (Ctrl+v). UseEvent's venuefor the label, and put both Label and Line edit widgets below the other two.Finally, let’s add some special QGIS input widgets and respective labels to control the date fields. Using any of the two options described in steps 7 and 8, find and insert two QgsDateTimeEdit widgets. Put them side by side, and above them add the labels Start date and End date. Your form should look similar to the one in the following figure:
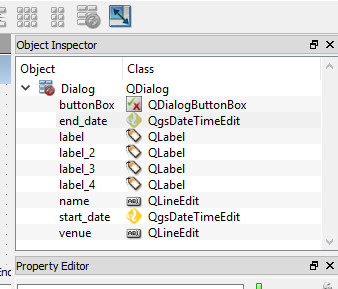
To connect this dialog’s input widgets to the QGIS layer’s fields, we need to set their objectName property’s value with the same name as the target field. As you will see, this can be done in several different ways.
Select the Name of event Line edit and in the Property Editor set the value of the objectName property to
name.Right-click the Venue of the event Line edit, and choose Change objectName. Set the value to have the name of the second field:
venue.For QgsDateTimeEdit widgets simply use the Object Inspector located above the Property Editor. Double-click on their current names and change them to
start_dateandend_dateBy now, all your input widgets should have the name of the corresponding fields, and in the Object Inspector you should have something similar to the next figure.
We are almost finished. All we need to do now is align all widgets so that they look good together. For that, we will use a grid layout.
Right-click anywhere on the dialog’s empty space (this will switch any focus over the widgets to the dialog instead) and choose (or use the toolbar). After that, all widgets should be aligned according to their relative place to each others.
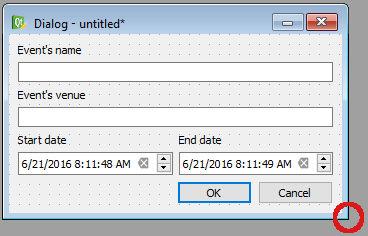
After you have applied the grid layout, you can now resize the form to make it more compact, by click and move the bottom-left-corner of the form.
Finally, using let’s save the form using a suggestive name, for instance
events_form.ui. For easy discovery, save it in the same folder that the data is located.Now, let’s go back to QGIS and test the feature form in action.
In QGIS, right-click the layer’s name in the Layers panel and choose Properties. Go to the Fields tab and in the Attribute editor layout select the
Provide ui-fileoption. Then, in the Edit UI browse to the events_form.ui location. Finally, press Ok to apply the changes and close the layer’s properties dialog.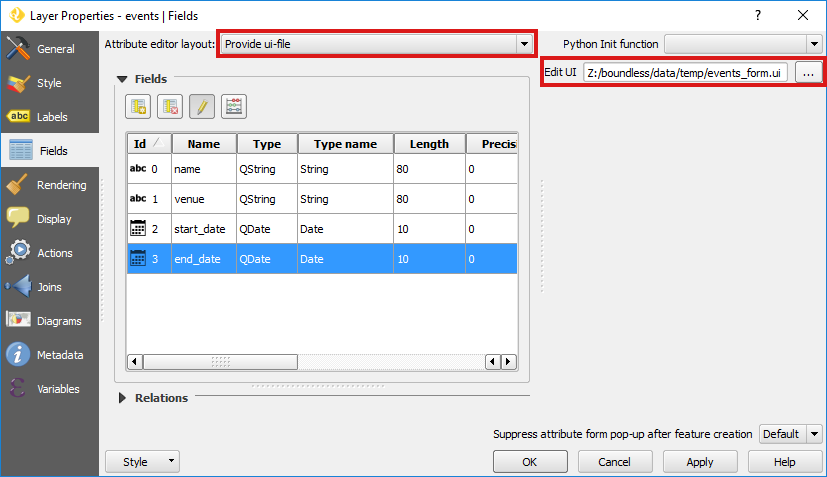
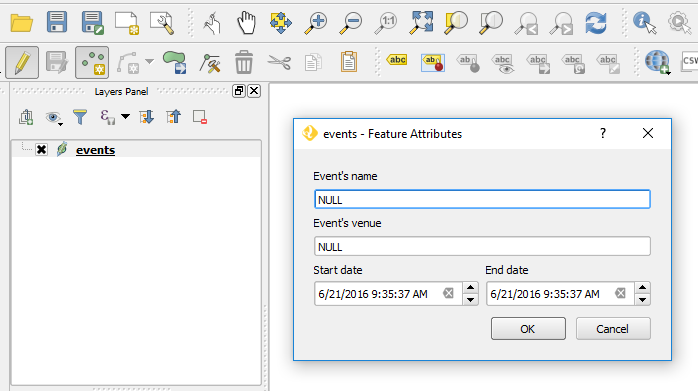
Assuming that the events layer is still in editing mode, let’s use the Add feature again to create a new point in the map canvas. This time, it should open the customised feature form created in Qt designer with all its widgets.
To finish our feature form, let’s make a small fix in the date fields otherwise the values won’t be saved in the table because of the use of different date formats in Qt form and QGIS.
Back in Qt Designer, select the two QgsDateTimeEdit widgets (Hold the
Ctrlkey while clicking) and, in the Properties Editor set the Display format value toyyyy-M-ddand check the calendarPopup property. The changes will be applied on both widgets. Save the form again.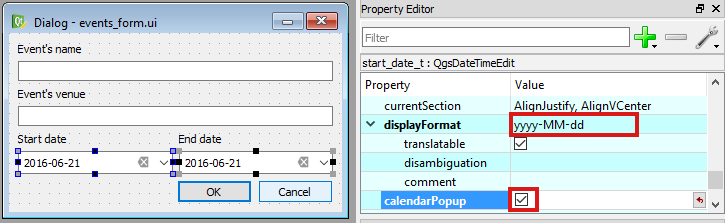
Back in QGIS, go to the fields tab in the Properties menu and for each date field change the widget to date/time. Make sure to use the same date format value in the Widget display as the one used in the form (
yyyy-MM-dd). Also select the calendar popup and allow NULL options. Press Ok when you have finished.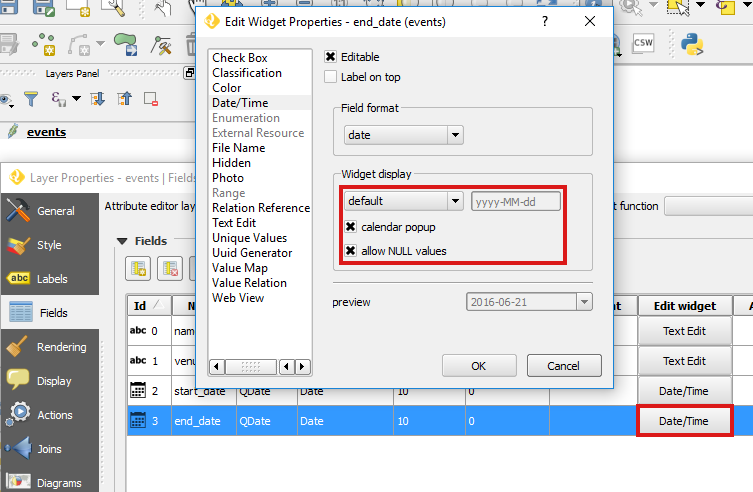
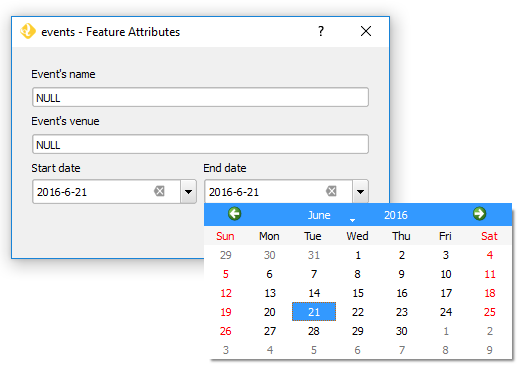
Now, repeat step #17 to see the feature form changes take effect. The date values should be represented differently and a new icon will alow to choose the date from a popup calendar. Besides, saving the input to the table will now work fine.
A lot more form customizations can be done using Qt Designer. You can use many different widgets, organise the widgets in groups or tabs, and you can even add some Python logic to make your forms responsive.
Online resources
- Official Site: http://www.qt.io
- Documentation: http://doc.qt.io/qt-4.8/designer-manual.html